[PR]
×
[PR]上記の広告は3ヶ月以上新規記事投稿のないブログに表示されています。新しい記事を書く事で広告が消えます。
プログラミング、3DCGとその他いろいろについて
[PR]上記の広告は3ヶ月以上新規記事投稿のないブログに表示されています。新しい記事を書く事で広告が消えます。

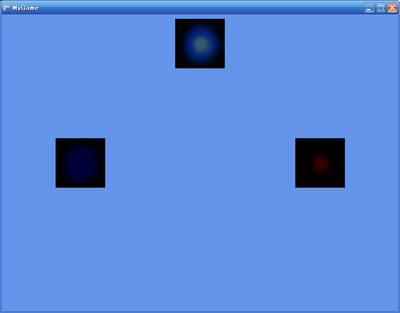
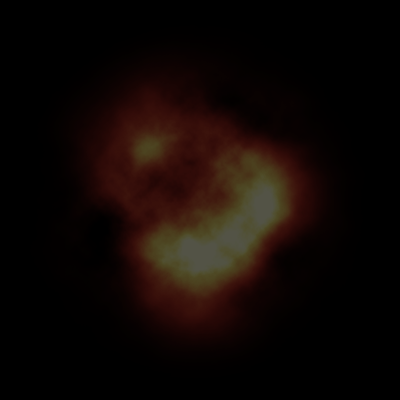 (爆発に使われた画像explosion.png)
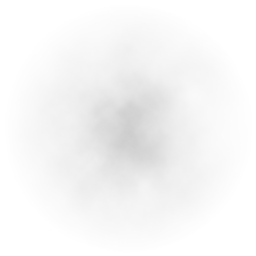 (煙に使われた画像smoke.png)
using Microsoft.Xna.Framework;
using Microsoft.Xna.Framework.Graphics;
public class MyGame : Microsoft.Xna.Framework.Game
{
GraphicsDeviceManager graphics;
BasicEffect effect;
VertexPositionColor[] vertices = new VertexPositionColor[3];
public MyGame()
{
graphics = new GraphicsDeviceManager(this);
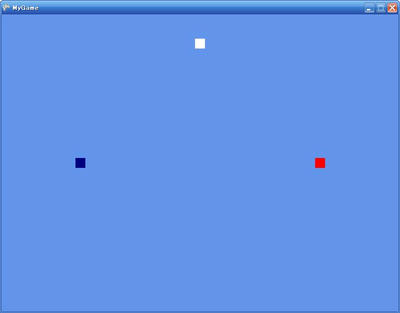
vertices[0] = new VertexPositionColor(new Vector3(0, 1, 0), Color.White);
vertices[1] = new VertexPositionColor(new Vector3(1, 0, 0), Color.Red);
vertices[2] = new VertexPositionColor(new Vector3(-1, 0, 0), Color.Navy);
}
protected override void LoadGraphicsContent(bool loadAllContent)
{
if (loadAllContent)
{
effect = new BasicEffect(graphics.GraphicsDevice, null);
effect.Projection = Matrix.CreatePerspectiveFieldOfView(
MathHelper.ToRadians(45),
Window.ClientBounds.Width / (float)Window.ClientBounds.Height,
1,
100
);
effect.View = Matrix.CreateLookAt(
new Vector3(0, 0, 3),
new Vector3(0, 0, 0),
new Vector3(0, 1, 0)
);
effect.VertexColorEnabled = true;
}
}
protected override void Draw(GameTime gameTime)
{
graphics.GraphicsDevice.Clear(Color.CornflowerBlue);
graphics.GraphicsDevice.VertexDeclaration = new VertexDeclaration(
graphics.GraphicsDevice,
VertexPositionColor.VertexElements
);
graphics.GraphicsDevice.RenderState.FillMode = FillMode.Point;
graphics.GraphicsDevice.RenderState.PointSize = 20;
effect.Begin();
foreach (EffectPass pass in effect.CurrentTechnique.Passes)
{
pass.Begin();
graphics.GraphicsDevice.DrawUserPrimitives<VertexPositionColor>(
PrimitiveType.TriangleList,
vertices,
0,
1
);
pass.End();
}
effect.End();
}
}
using Microsoft.Xna.Framework;
using Microsoft.Xna.Framework.Graphics;


public class MyGame : Microsoft.Xna.Framework.Game
{
    GraphicsDeviceManager graphics;
    BasicEffect effect;

    VertexPositionColor[] vertices = new VertexPositionColor[3];

    public MyGame()
    {
        graphics = new GraphicsDeviceManager(this);

        vertices[0] = new VertexPositionColor(new Vector3(0, 1, 0), Color.White);
        vertices[1] = new VertexPositionColor(new Vector3(1, 0, 0), Color.Red);
        vertices[2] = new VertexPositionColor(new Vector3(-1, 0, 0), Color.Navy);
    }

    protected override void LoadGraphicsContent(bool loadAllContent)
    {
        if (loadAllContent)
        {
            effect = new BasicEffect(graphics.GraphicsDevice, null);
            effect.Projection = Matrix.CreatePerspectiveFieldOfView(
                MathHelper.ToRadians(45),
                Window.ClientBounds.Width / (float)Window.ClientBounds.Height,
                1,
                100
                );
            effect.View = Matrix.CreateLookAt(
                new Vector3(0, 0, 3),
                new Vector3(0, 0, 0),
                new Vector3(0, 1, 0)
                );
            effect.VertexColorEnabled = true;
        }
    }

    protected override void Draw(GameTime gameTime)
    {
        graphics.GraphicsDevice.Clear(Color.CornflowerBlue);

        graphics.GraphicsDevice.VertexDeclaration = new VertexDeclaration(
            graphics.GraphicsDevice,
            VertexPositionColor.VertexElements
            );

        graphics.GraphicsDevice.RenderState.PointSize = 20;

        effect.Begin();

        foreach (EffectPass pass in effect.CurrentTechnique.Passes)
        {
            pass.Begin();

            graphics.GraphicsDevice.DrawUserPrimitives<VertexPositionColor>(
                PrimitiveType.PointList,
                vertices,
                0,
                3
                );

            pass.End();
        }

        effect.End();
    }
}
 (ちなみに、背景が黒なのは後で透過処理をするときにそこが透明であると解釈されるからです)
using Microsoft.Xna.Framework;
using Microsoft.Xna.Framework.Graphics;
using Microsoft.Xna.Framework.Content;
public class MyGame : Microsoft.Xna.Framework.Game
{
GraphicsDeviceManager graphics;
BasicEffect effect;
VertexPositionColor[] vertices = new VertexPositionColor[3];
ContentManager content;
Texture2D texture;
public MyGame()
{
graphics = new GraphicsDeviceManager(this);
content = new ContentManager(Services);
vertices[0] = new VertexPositionColor(new Vector3(0, 1, 0), Color.White);
vertices[1] = new VertexPositionColor(new Vector3(1, 0, 0), Color.Red);
vertices[2] = new VertexPositionColor(new Vector3(-1, 0, 0), Color.Navy);
}
protected override void LoadGraphicsContent(bool loadAllContent)
{
if (loadAllContent)
{
effect = new BasicEffect(graphics.GraphicsDevice, null);
effect.Projection = Matrix.CreatePerspectiveFieldOfView(
MathHelper.ToRadians(45),
Window.ClientBounds.Width / (float)Window.ClientBounds.Height,
1,
100
);
effect.View = Matrix.CreateLookAt(
new Vector3(0, 0, 3),
new Vector3(0, 0, 0),
new Vector3(0, 1, 0)
);
effect.VertexColorEnabled = true;
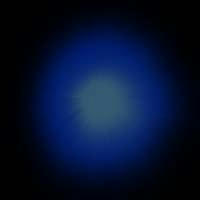
texture = content.Load<Texture2D>("blueFire");
}
}
protected override void UnloadGraphicsContent(bool unloadAllContent)
{
if (unloadAllContent) { content.Unload(); }
}
protected override void Draw(GameTime gameTime)
{
graphics.GraphicsDevice.Clear(Color.CornflowerBlue);
graphics.GraphicsDevice.VertexDeclaration = new VertexDeclaration(
graphics.GraphicsDevice,
VertexPositionColor.VertexElements
);
graphics.GraphicsDevice.RenderState.PointSpriteEnable = true;
graphics.GraphicsDevice.RenderState.PointSize = 100;
effect.Texture = texture;
effect.TextureEnabled = true;
effect.Begin();
foreach (EffectPass pass in effect.CurrentTechnique.Passes)
{
pass.Begin();
graphics.GraphicsDevice.DrawUserPrimitives<VertexPositionColor>(
PrimitiveType.PointList,
vertices,
0,
3
);
pass.End();
}
effect.End();
}
}
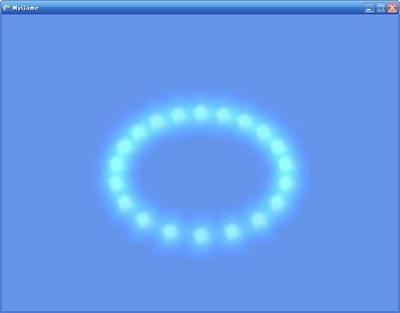
 ※そのままでは見にくいのでサイズを100にしました
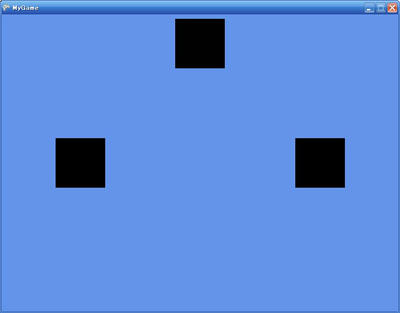
using Microsoft.Xna.Framework;
using Microsoft.Xna.Framework.Graphics;
using Microsoft.Xna.Framework.Content;
using System;


public class MyGame : Microsoft.Xna.Framework.Game
{
    GraphicsDeviceManager graphics;
    BasicEffect effect;

    VertexPositionColor[] vertices = new VertexPositionColor[20];

    ContentManager content;
    Texture2D texture;

    public MyGame()
    {
        graphics = new GraphicsDeviceManager(this);
        content = new ContentManager(Services);

        for (int i = 0; i < vertices.Length; i++)
        {
            vertices[i] = new VertexPositionColor(
                new Vector3(
                    (float)Math.Cos(2 * Math.PI * i/vertices.Length),
                    0,
                    (float)Math.Sin(2 * Math.PI * i / vertices.Length)),
                Color.White
                );
        }
    }

    protected override void LoadGraphicsContent(bool loadAllContent)
    {
        if (loadAllContent)
        {
            effect = new BasicEffect(graphics.GraphicsDevice, null);
            effect.Projection = Matrix.CreatePerspectiveFieldOfView(
                MathHelper.ToRadians(45),
                Window.ClientBounds.Width / (float)Window.ClientBounds.Height,
                1,
                100
                );
            effect.View = Matrix.CreateLookAt(
                new Vector3(0, 3, 3),
                new Vector3(0, 0, 0),
                new Vector3(0, 1, 0)
                );

            texture = content.Load<Texture2D>("blueFire");
        }
    }

    protected override void UnloadGraphicsContent(bool unloadAllContent)
    {
        if (unloadAllContent) { content.Unload(); }
    }

    protected override void Draw(GameTime gameTime)
    {
        graphics.GraphicsDevice.Clear(Color.CornflowerBlue);

        graphics.GraphicsDevice.VertexDeclaration = new VertexDeclaration(
            graphics.GraphicsDevice,
            VertexPositionColor.VertexElements
            );

        graphics.GraphicsDevice.RenderState.AlphaBlendEnable = true;
        graphics.GraphicsDevice.RenderState.SourceBlend = Blend.One;
        graphics.GraphicsDevice.RenderState.DestinationBlend = Blend.One;

        graphics.GraphicsDevice.RenderState.PointSpriteEnable = true;
        graphics.GraphicsDevice.RenderState.PointSize = 100;

        effect.Texture = texture;
        effect.TextureEnabled = true;

        effect.Begin();

        foreach (EffectPass pass in effect.CurrentTechnique.Passes)
        {
            pass.Begin();

            graphics.GraphicsDevice.DrawUserPrimitives<VertexPositionColor>(
                PrimitiveType.PointList,
                vertices,
                0,
                vertices.Length
                );

            pass.End();
        }

        effect.End();

        graphics.GraphicsDevice.RenderState.AlphaBlendEnable = false;
    }
}

using Microsoft.Xna.Framework;
using Microsoft.Xna.Framework.Graphics;
using Microsoft.Xna.Framework.Content;
using System;


public class MyGame : Microsoft.Xna.Framework.Game
{
    GraphicsDeviceManager graphics;
    BasicEffect effect;

    VertexPositionColor[] vertices = new VertexPositionColor[20];

    ContentManager content;
    Texture2D texture;

    public MyGame()
    {
        graphics = new GraphicsDeviceManager(this);
        content = new ContentManager(Services);

        for (int i = 0; i < vertices.Length; i++)
        {
            vertices[i] = new VertexPositionColor(
                new Vector3(
                    (float)Math.Cos(2 * Math.PI * i/vertices.Length),
                    0,
                    (float)Math.Sin(2 * Math.PI * i / vertices.Length)),
                Color.White
                );
        }
    }

    protected override void LoadGraphicsContent(bool loadAllContent)
    {
        if (loadAllContent)
        {
            effect = new BasicEffect(graphics.GraphicsDevice, null);
            effect.Projection = Matrix.CreatePerspectiveFieldOfView(
                MathHelper.ToRadians(45),
                Window.ClientBounds.Width / (float)Window.ClientBounds.Height,
                1,
                100
                );
            effect.View = Matrix.CreateLookAt(
                new Vector3(0, 3, 3),
                new Vector3(0, 0, 0),
                new Vector3(0, 1, 0)
                );

            texture = content.Load<Texture2D>("blueFire");
        }
    }

    protected override void UnloadGraphicsContent(bool unloadAllContent)
    {
        if (unloadAllContent) { content.Unload(); }
    }

    protected override void Draw(GameTime gameTime)
    {
        graphics.GraphicsDevice.Clear(Color.CornflowerBlue);

        graphics.GraphicsDevice.VertexDeclaration = new VertexDeclaration(
            graphics.GraphicsDevice,
            VertexPositionColor.VertexElements
            );

        graphics.GraphicsDevice.RenderState.AlphaBlendEnable = true;
        graphics.GraphicsDevice.RenderState.SourceBlend = Blend.One;
        graphics.GraphicsDevice.RenderState.DestinationBlend = Blend.One;
        graphics.GraphicsDevice.RenderState.DepthBufferWriteEnable = false;

        graphics.GraphicsDevice.RenderState.PointSpriteEnable = true;
        graphics.GraphicsDevice.RenderState.PointSize = 100;

        effect.Texture = texture;
        effect.TextureEnabled = true;

        effect.Begin();

        foreach (EffectPass pass in effect.CurrentTechnique.Passes)
        {
            pass.Begin();

            graphics.GraphicsDevice.DrawUserPrimitives<VertexPositionColor>(
                PrimitiveType.PointList,
                vertices,
                0,
                vertices.Length
                );

            pass.End();
        }

        effect.End();

        graphics.GraphicsDevice.RenderState.AlphaBlendEnable = false;
        graphics.GraphicsDevice.RenderState.DepthBufferWriteEnable = true;
    }
}
 [1回]
[1回]